Showing posts with label kitchen. Show all posts

Monday, April 9, 2012

kitchen source list

Here's a roundup of where we got everything...


Cabinets:  Adel White, Ikea
Cabinet Hardware:  matte black pulls on sale at Lowes


Sink: Kraus Undermount Sink, Overstock
Faucet: Vigo Stainless Pullout Faucet, Overstock
Rug:  $15 on clearance at TJMaxx (with $5 clearance anti-fatigue mat underneath from Lowes)
Pendant Lights: Schoolhouse Pendant, The Lamp Goods (also on Etsy)
Under Cabinet Lighting:  SuperBright LEDs, http://www.inspiredled.com/


Backsplash:  White subway tile, Lowes
Countertops:  White Corian (the Allen&Roth/Lowes brand)
Shelf materials (brackets, wood, trim): Home Depot


Appliances:  Kitchenaide Gallery, Yale Appliance
Flooring:  Old Madrid 20x20 tile, Best Tile
Under floor heating:  NuHeat, (also purchased through Best Tile)
Wall Paint:  Hot Stone, Valspar/Lowes
Crown Moulding/Shelf/Touch up paint:  custom mix, Sherwin Williams

*Update:  I've had a lot of people ask for the formula for the paint match of the Adel White color.  Here is a bad cell phone picture of our paint label and I will try to take a better picture soon!


All other supplies and accessories were already on hand.

Sunday, April 1, 2012

DONE! (For now.)

Yep.  Finally.  Our kitchen is done.  (OK, so we have a few other things to do in this room like replace the three front windows and build a window seat but those will be ongoing projects.)

We finished painting and hanging our shelves...


I also tweaked the small cubbies to the right of the sink.  Instead of 5, there are now 4 cubbies that fit small baskets for storage...


We finished installing and painting the crown moulding...


One project off the to-do list, 37 (and counting) to go!


Wednesday, March 28, 2012

crown moulding

Having the open space between the top of our cabinets and the ceiling irked me almost as much as our pre-tiled walls.  (Sidenote: Yes, a lot of things irk me.  Maybe I'll post a list of all things that irk me but first I should find out how many characters blogspot.com allows per post.)  We didn't want a big piece of ornante moudling to distract from the simple lines of our cabinets so we opted for the simplest pieces of moulding that would fit our space.


First, we needed to devise a way for our moulding to attach to our cabinets.  We don't forsee us ever putting any pressure on the moulding except for the occasional dusting but it still needed to be attached.  To keep from drilling or nailing through our new cabinets, we decided to use epoxy to secure pieces of scrap wood to the top of our cabinets so that the first layer of crown had a place to butt up against.  The wooden blocks were secured to the top of our cabinets 3/4" away from the edge - that way our 3/4" deep moulding would be flush with the front of the cabinet box. Get it?  Since all of that may only make sense in my head, here are our cabinets with the pieces of scrap wood attached:


From there, we took the first layer of moulding and rested that on top and flush with the edge of the cabinets.  (Note:  this first layer is basically just a piece of wood that was 4"tall x 3/4"deep - except it isn't regular wood - it's some kind of composite that was cheaper and lighter than regular wood.)  I used our finish nailer to drive two little nails through the moulding and into the pieces of scrap wood behind it.  Result:  a piece of moulding that is attached to our cabinet that didn't require drilling or nailing through our cabinet.  (OK, to be honest, I did have to nail through our cabinets in two places where the piece of scrap wood didn't completely cure to the top of the cabinet for whatever reason - but I just used a tiny pin nail that you'll never be able to see.)


Don't mind all the junk on the counters - just looking at this picture gives me sweaty palms...


Layer two was less fun.  I consider myself a fairly intelligent person and even majored in math for the majority of my college career - but all of my math skills and logic escaped my brain when trying to cut crown moulding at 9:00pm after an exhausting day.  Several mistakes and test cuts later, I finally figured it out and managed to still have 10 fingers after a long battle with our miter saw.

Because our ceiling isn't completely level, the gap between moulding layer #1 and the ceiling wasn't consistent across the span of our cabinets.  Moulding layer #2 masked this discrepancy.  Once all pieces were cut to size, I again used our finish nailer and pinned these pieces right to the ceiling.


We then filled the few seams so that the cabinets and both layers of moulding looked like a single piece as opposed to 3 separate units stacked together.  We also filled in all of the tiny nail holes.  After giving everything a light sanding, we were ready to paint.

I started to paint a few pieces of moulding before installing but noticed that it got fairly dinged up during the installation process so I skipped the pre-painting step and opted to give everything two clean coats once all pieces were in place.  We still have another coat and some touch ups to do but we're nearly there!


It gives the cabinets a much richer feel and makes the entire room feel so much taller.  Yay for optical illusions!

And for the love of before/progress/after photos:


Remaining to dos:
  • Replace the 3 front-facing windows
  • Construct a window seat/bench along open wall
  • Find fabric and make some curtains
  • Add other decorative touches such as art, a mirror by the back door, hooks, etc?

Monday, March 26, 2012

the post that Joe was supposed to title

Once our new wall tile was given about 48 hours to set, we proceeded to grout.  We opted for bright white grout and also made sure to mix it with a solution recommended by the tile shop.  'Grout Once' is a solution that is used to mix the powdered grout in lieu of water that saves the extra step of sealing grout.  We used it when mixing the grout for our floor tile and while only living with it for a few weeks, we've noticed that it's particularly easy to clean - and with a 17-month-old running around, we're constantly wiping up spills from the kitchen floor.


Grouting all of that wall tile wasn't nearly as bad as I thought it would be - cleaning it all up is what sucked the life out of us.  Once we found a nice consistency, we just slapped it on the tiles with rubber grout floats and we had the whole kitchen done in an hour or two.  Then we started to clean it all up.  We gave it a good wipe-down just a few minutes after we were done smooshing the grout into all of those little spaces.  Wiping it down with a damp sponge really smoothed out the grout lines but made the actual tile look like a foggy mess.  As not to re-live the nightmare of the tile-cleaning process and to keep from typing out the word "grout" too many more times, I will just summarize by saying we spend the next two days wiping down our white tile.  For anyone out there that might be needing to clean that hazy film left on the face of your tiles by grout, I will point out that baby wipes are your best friend.  I know they make special cleaners just for this purpose but I think I've been to Lowes about 97 times in the past two months so using something we already had on hand was a win in my book.  After trying to buff our tiles with a dry towel, we tried baby wipes and it gave us the nice clean, shiny finish we wanted without the sore arms.

(For unknown reasons, I don't have pictures to show the mid-grout or the post-grout process.  Instead, you will have to settle for the next step in our kitchen reno process...)


After allowing our tile to set and grout to fully cure, we had the green light to proceed with hanging our open shelving.  Open shelving seems to be a popular thing these days and there are endless sources on the web that will explain how to hang and provide tons of eye candy.  For two long L-shaped shelves, we needed a total of 12 brackets.  Each bracket is attached to the wall with two screws.  In order to attach those brackets to the wall, we had to drill 24 holes into our new tile.  I must admit that the thought of drilling through new tile was nauseating but we got it done without any issues.


I measured, checked for level, measured again, stood back for a better view while Joe held up a sample bracket and shelf, measured a few more times, checked for level again, and then finally marked where my first screw hole would go.  Repeat 23 more times.  Luckily the wall studs created an even bracket placement so every bracket is secured to a stud - somewhat alleviating my fear of hearing a shelf full of dishes crash down in the middle of the night.  (Note:  we checked for studs before tiling this wall and made marks on the ceiling - that way we could easily determine where the studs were even after the tile was up.  I don't think a stud finder or the ol' tap-the-wall trick would have been as effective through a wall full of tile.)


(Yes, I am fully aware that those shelves are too long.  I just had them up there temporarily to get a better idea of how everything would look - not like there was any turning back at that point though!)

After we trimmed those shelves down to size, everything needed to be primed and painted.  I had brought one of our cabinet doors to a local Sherwin Williams store for them to color match and came home with a gallon of paint - way more than I needed but I figured I would use it for several coats on the brackets, shelves, and crown moulding - as well as any other touch-ups.  Since it was a custom color that the rep tweaked for me, I didn't want to run the risk of running out and then not getting the exact same color a second time.


Admittedly, I'm not a very patient person.  Because of this, painting something that requires primer, several coats of paint, and a little sanding in between each coat is a painful process for me.  Since we both work regular 9-5's and only had an hour or so to work on them each night (although I've decided to start playing the lottery so that won't be an issue for much longer) we finally got everything painted over the course of a few days.

I'm giving the shelves another day to dry before I attach them to the brackets so I hope to have pics of everything completed shortly!

Up next:  Crown Moulding: The Leading Cause of Divorce

Saturday, March 10, 2012

tile mania.

Since moving in last May, we had the pleasure of staring at some retro wallpaper in our kitchen.


I finally had enough of it and tore it down one weekend last summer.  While it was a slight improvement, the bare laminate backsplash was still a sight for sore eyes.


Then we began demo on our kitchen in January of this year.  The laminate backsplash came down to uncover some nasty epoxy residue.  Things have to get worse before they get better, right?!


The new cabinets and counters were a slight distraction but I couldn't help but cringe at the sight of my beautiful new kitchen paired with those grungy walls.  I'm all for the rustic vibe but this was a little much.


Until today...


We still have to grout it all but I think this has been my favorite update of the entire two month kitchen reno process.


Holy bright white kitchen.  I love you.  My cleaning habits will definitely need to be kicked up a few notches but that's not such a bad thing.


Open shelves will be installed on this wall...


We still need to install the crown moulding.


And replace these old windows...


...but, for now, I will enjoy my clean, bright, new space!


Wednesday, February 29, 2012

some finer details

It might sound strange but seeing our kitchen renovation drawing to a close is kind of a bummer.  Joe might have a different opinion but I have really enjoyed the chaos, stress, and long to-do-lists.  For the past month or two, I have been excited to tackle a new project each day and watch the progress!

The majors steps have been completed - demo, new floors, cabinet installation, new appliances, and new countertops.  We also wrapped up some of the smaller details over the past few days.

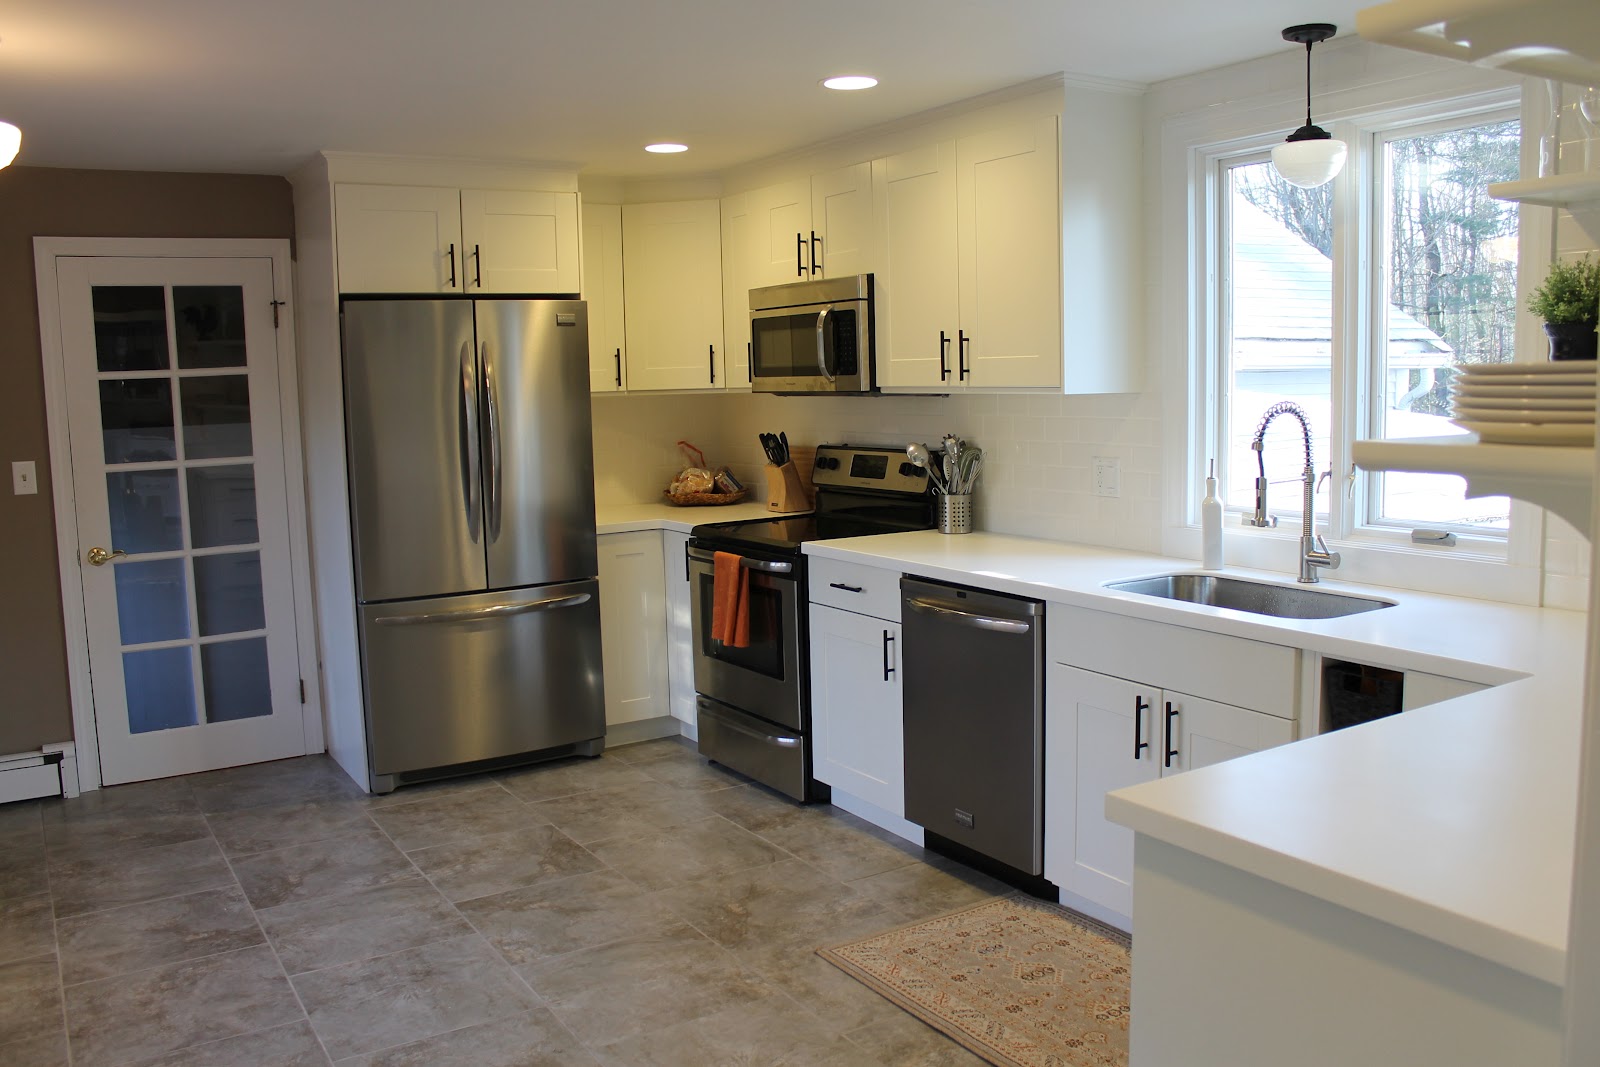
After the plumbing was finished (running water! yay! no more washing dishes in the tub! yay!), we installed the small shelves next to the sink.  We had left this piece out so that it was easier to access the pipe located behind it.  While these shelves probably aren't the ideal solution, there isn't really a 9" cabinet that you can squeeze into this spot and still keep the sink centered under the window.  We eventually plan to do something to cover up the shelves - probably by building small drawers for each.  I also thought about making a mini curtain to hang over them but I don't think that would deter little hands from making their way in and pulling out all contents.


We installed some filler pieces on either side of the sink cabinet so there aren't any noticeable gaps.

We also added a filler piece between the tall cabinet and the wall.  The cabinet had to be set an inch or so away from the wall so that the doors open properly and I wanted to make sure this space was filled - in an attempt to make it look more "built-in" and to keep that space from being a dust trap.  As our walls aren't 100% straight, we also caulked the seams around this cabinet to, again, keep it from looking like a random, free standing cabinet.  I hope that adding the crown moulding around the whole room will finish this piece off.  (Oh, and this cabinet isn't crooked - the photographer is.)


We installed the toe-kick.  No explanation needed.


Another finishing detail was the window trim.  I previously painted the casing and left the trim pieces off until the counters were installed.  We decided not to have the tile backsplash run under the window to keep it from looking too busy.  Instead, we got a PVC board to run this length so there's no concern about it getting wet and rotting - or allowing water to seep through to the wall or behind the cabinets.  Because it wasn't the same tone of white as the rest of the boards, I purchased some heavy duty primer before painting the PVC board. I was told this primer sticks to glass so I'm keeping my fingers crossed that it holds up.  (And, no, I didn't give up after installing 3 backsplash tiles - those are just propped up to the right of the window so I could get a visual on how all the different whites would coordinate!)


Another water-seepage prevention step we took was to run a bead of clear silicone along the inside seams of the sink cabinet.  We already had some on hand so it was a fast and free step that will give me peace of mind if the plumbing were to leak or something were to spill out of the trash that is also located under the sink.  It wasn't a necessary step but I guess it's a good precaution to take - moisture getting into the seams of our new cabinets could be devastating!


I came across this indoor/outdoor mat at TJMaxx for $15.  I wasn't sure how it would "go" with the kitchen but was pumped when I got it home to find that it matched perfectly.


I put in on top of an anti-fatigue mat that we had in our old kitchen.  It's super comfy to stand on AND it makes the firm mat look like a thicker rug.


We also hung the light over the sink - matching the one we recently hung on the other side of the kitchen.

We have a fully functioning kitchen now so we can take our time with the remaining to-dos.  (We can take our time but, if you know me, I want stuff done immediately and am not very good at sitting around waiting for things to happen!)
  • install the backsplash
  • install crown moulding
  • hook up the under-cabinet lighting
  • hang the open shelves
  • replace the bank of 3 windows that look out onto the front yard
  • make curtains for all windows
  • build a bench to go under front windows
  • hang shelves (or similar solution) on either side of the bench
We started the demolition on January 17th and I'm proud to say that it looks like we will meet our goal of completing all major steps of the kitchen renovation in less than 2 months.  I think I might celebrate by starting to plan a bedroom reno - or a bathroom reno - or maybe a 2nd floor dormer addition?!  (Uuugh...I hope Joe isn't reading this!)