Wednesday, September 28, 2011

camera bag

As mentioned in an earlier post, the main lens I use on my camera was involved in a tragic accident and went on to a better life.  I ordered a new one and it arrived the other day.  Woo!  Seeing that I carry two different lens in my small, cramped bag, I figured now is as good of a time as any for a new one.  Unfortunately, decent looking camera bags cost a crap-load of money for some reason.  I'd love to have a Ketti Handbag but I would also like my son to eat for the next few months.

So, I decided to make my own - for a fraction of the price.

Supplies:
A purse - preferably one that is sturdy and has a large main compartment (as opposed to a purse that has a few dividers already built in)
Batting
Headliner fabric - thats the stuff you'd probably find on the roof of your car (inside, duh) but they sell it at any fabric store.  I probably used about a 1/2 yard.
Velcro
Cardboard

Forgive me in advance but I don't know the technical terms for any of this stuff.  Also, I'm not much of an instructions gal so I pretty much just winged it.  As with all DIY projects, you can find a zillion tutorials online if you want to attempt your own bag.

Here's the purse I started out with.  I think it was about $15-20 at Marshalls.  (I don't remember the exact amount but I try not to spend more than $20 on anything so I assume that's how much it cost.)

I cut a few rectangular pieces of cardboard out of a box from our recycling bin.  I then laid the pieces inside of the purse to make sure they were the right size.  One piece lays flat on the bottom of the purse and the other two lay horizontally on each side.  I made sure the horizontal pieces weren't too tall so that I can still make use of the side pockets in the purse.  I wrapped the bottom piece in some batting.  The headlining fabric has some cushion to it so the batting just added some extra smoosh to the bottom.

Next, I laid out a long piece of the headlining fabric, the same width of the pieces of cardboard I already cut out.  I figured out where I wanted to secure a few pieces of velcro and then sewed it on.  I forgot to take a picture of that step but here is a picture from later on in the process but it shows what kind of velcro I used:

Next, I folded the piece of fabric in half and then sewed seams in where the folds/bends in my camera bag insert would go.  I hope this picture explains it because I don't know how I would with words.
In the picture above, I already sewed two straight lines where the insert would fold up along the sides of the purse.  The opening that I am holding up will be at the bottom of the purse and won't show - so I wasn't worried about doing anything major to hold it together.  To close up the ends, I just sewed a straight line down the two sides of the insert.  Here it shows how it will look inside of the purse:
Disregard the horrible sewing job but James was napping and I knew I probably only had another 10 minutes to finish this project.  Yes, I was rushing.  No biggie though - all of this would be inside of the purse and not-so-visible.  See...no more wiggly lines!
I've seen several tutorials online that make sides for the insert but that would have been too fancy for me.  Instead, I just made three dividers to slip inside.  Because they have velcro on the ends, they can be adjusted to fit whatever it is they are dividing:
With these all sewed up and inserted into the insert, it looks like this:
I could make additional dividers if I wanted to tote around additional lens or other items.  For now, it holds a spare lens, my camera (old camera is in the pic above for staging purposes along with some rolled up batting in the 3rd compartment) as well as a wallet, phone, etc. can all fit!

Much better than what I used to have to carry around in addition to my regular purse!


Sunday, September 25, 2011

not-so-quick bathroom fix

I have yet to share any pictures of our main bathroom.  There's nothing terribly wrong with it...except for the nasty green sponge paint it was sporting.  It made me cringe every time I've gone in there since we moved in this past May.  Sherwin Williams was having a 40% off sale this weekend so that gave me a good excuse to go buy a can of bathroom paint and fix 'er up!

It was supposed to be an easy project.  There's wainscoating on the bottom half of the walls so the area that would actually require paint was fairly small.  To make sure the green didn't sneak through the light colored paint we chose, we decided to throw a quick coat of primer on the walls.  About 20 minutes later, the priming phase of our bathroom makeover was done.  (Joe manned the roller while I took to the trim and cutting in.  For someone who admittedly isn't very patient, I really enjoy that tedious task for some reason.)

A short while later, I went to check on the primer to see if it was even close to being dry.  It was...but I also noticed something else...bubbles.  There were bubbles forming on two of the walls.  Uuuugh.  That horrible green sponge paint was actually over a layer of wall paper.  People who paint over wallpaper should be thrown in jail.  We couldn't ignore the fact that there was wallpaper under the paint and we certainly couldn't ignore the bubbles on two of our walls.  After several curse words and a few attempts at pulling off chunks of wallpaper, we realized two things:  1.  Whoever papered the wall did an amazing job.  We couldn't even see any seams.  Without the bubbles we never would have known that crap was even on the wall.  2.  The wallpaper was only on two of the walls.  It appears that the paper was only on the walls that were a part of the original bathroom.  We think the original bathroom used to end about halfway between these two windows.  (Warning:  Horrible green sponge paint + still having to use my old, junky camera = a nasty sight...)
So, we spent 20 minutes priming the entire bathroom and another 5 hours trying to scrape wallpaper off two of the walls.  Luckily, the walls underneath the wallpaper were white and in perfect condition so no repairs or additional priming was necessary.

I still want to paint all of the orange-y wood work, replace the fixtures, replace the vanity and install a new steam shower - and Joe wants to install a $5,000 toilet.  We dream big.  For now, we'll settle for a fresh coat of paint.

Scroll on and off the pictures below to see the before and after...

Despite the sweat and patience that was lost during this 'quick" project, it was all worth it.  The bathroom feels twice as big and I don't have that sickly green glow when I look in the mirror.  Well, I still have a sickly glow but that's attributed to pure exhaustion and not green sponge paint.

(In case you aren't able to see the before and after pics above, here's what you missed...)


Sunday, September 18, 2011

new shoes.

It's been several days since I've made an update on our mudroom & laundry room progress.   We finished everything up in the mudroom last week but I just haven't had a chance to take any pictures.  It's a shame that I waited to take pictures because there was a tragic accident with my camera today so it might be out of commission for a while.  By "tragic" I mean "got caught up while taking the stroller out of the trunk which led to the camera going flying which led to the camera smashing on the ground which led to my lens shattering.  Just thinking about it makes me ill.  Yeh, I know it's just a thing and it can be replaced...but it's a pretty damn expensive thing.  I have another lens but it isn't as versatile and will limit the types of pics I can take for a while.

Aaaaaanyways...that's the reason for the poor photos below.

Our mudroom started out like this...
We added a board and batten treatment to the walls and painted the top portion a chocolate brown.  (Side note:  the chocolate brown paint was an "ooops paint" find at Lowes for a whopping $2.50.  Yeh, $2.50 for an entire can of paint.)

We still have to hang some coat hooks and paint the doors but that will be a quick project one of these days.

As for the laundry room, it started out looking like this...
We painted the walls, stacked the washer/dryer, added some storage and built a tabletop for the long wall opposite the window.  The paint from this room was another "ooops paint" find for $5.00.  I guess I'll put my dollars saved on paint towards a new camera lens.

 The table top is just made out of a few tongue and groove boards.  We used liquid nails along with our nailer to secure them together and they are resting on top of some ugly storage cabinets.  To hide those cabinets, I used some discount fabric I bought a few weeks ago and made a skirt.  The skirt is secured to the underside of the table top with velcro so I can remove it easily if it ever needs to be washed or switched out.  (This is another shining example of the fact that I don't iron.  As the wrinkles are flattening themselves out, it has also come to my attention that I need to hem the skirt an inch or so.)  Oh, and we also need to re-hang the clothes rod as well as a few shelves in this room.  I'm not sure why this picture makes the skirt look mustard-y but it totally isn't in real life.  It's more of a lively, lime green.
 I also used some more of that discount fabric to make some curtains.  Again, horrible camera = horrible lighting = horrible picture but you get the idea...
So there's our mudroom and laundry room....approximately 83% done.

On a personal note, James got his first pair of sneakers today.  It's amazing how such a minor thing can make him look so much older.  Sigh....

Thursday, September 8, 2011

prime time.

I wanted to throw together a quick post to show stage 2 of our mudroom-board-and-batten extravaganza - if only to limit the number of pics I would post to show the finished project (whenever that may be!).

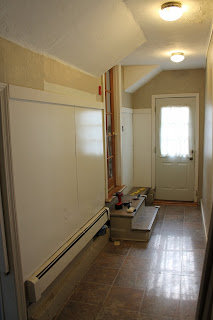
We got all of the pieces of our board and batten up on the walls.  It was a fairly easy project.  You can find a zillion sites with step-by-step instructions all over the interweb so I won't attempt to share our own version.  We kind of just winged it!  The only issue we had was due to the fact that one wall of our mudroom is textured - like, majorly textured.  Instead of tearing down the wallboard or attempting to sand it flat, we opted to cover the lower portion of the wall with white wall board.  (It's basically the same thing that they use to make dry erase boards.)  We then used 1x4's for the top and base and 1x2's for the vertical pieces.  (Note: we used primed MDF board from Lowes for these pieces so those are rough measurements.)
Everything is primed (hence the spotty "paint" job) and ready to be painted with the real stuff - hopefully this weekend.

Ladies and gentleman, Liz and Joe's board and batten...

Oooh, wait, first a "before" pic...


...and how it looks today....


Remember, so far it has only been primed so everything will be clean, solid white once we are finished.  Everything that is above the top board will be painted - our tentative plan is to go with a chocolate brown but that could change.

For anyone wanting to do this on your own, it really shouldn't take you 2 weeks like it has us.  We've only had a few spare hours here and there to work on this but I would definitely call this a weekend project - that is, if you don't have a rambunctious little man demanding all of your attention!

Oh, and if you want more examples of board and batten treatments, visit http://ourhumbleabowed.wordpress.com/.  Amanda and her hubby have done a similar (yet more intricate) treatment on several rooms in their home and it looks ridiculously awesome - plus they have more detailed instructions - and double plus, she is super sweet and has tons of other fun DIY ideas!

Well, my computer is at 5% and I don't want to go searching for it's power cord so, g'night!

Saturday, September 3, 2011

laundry room update and cows.

Yep, that pretty much sums up our Saturday.  Since the last update, I finished painting the laundry room.  We stacked the washer/dryer and put a few shelving/drawer units in the room.  There's still a bunch of little things to get done in there but, for now, the major updates are done.  The taller drawers are great for us tall-folk and are the perfect height for folding clothes, ironing, etc.  I'm not too cool with them partially covering the window but I hope to mask that a bit with some curtains.
We still have to build a table-top to go on top of these...
I grabbed this fabric this morning for super cheap.  (Joann's fabric was having a 50% off sale if anyone needs that sort of stuff.)  I plan on making some curtains as well as a skirt to go around the table on the long wall of the laundry room - to cover those three wire drawers in the pic above.  Joe put on his best "I love it!" face when I showed him the fabric I chose.  He's a horrible liar.  I still don't know what he was hoping for...probably something with the Reds or Aston Martin logo plastered all over it.
We also started to get the board and batten up in the mudroom.  We're about halfway done with that project so I'll post some more pics when it's done.  For now, here's the last pic I took before the sun started to set...
Joe promised me that, if I behaved myself, we could go to Peaceful Meadows for dinner.  They have the most delicious ice cream around - and they are right down the street from us.  (I swear, that only played a minor role in our decision to buy this house.)  James has gotten pretty good at his cow sounds so I figured he'd like to see the real thing.

There was only this calf and one other cow in the barn when we were there.  The others were still out galavanting.  James was pretty psyched.  These cows weren't mooing and they weren't spotted like all the ones in his books so I'm not even sure he knew they were cows.  He might have just assumed they were really big, smelly dogs.  Regardless, he just wanted at 'em!
I'm pretty sure this isn't allowed but it's always been one of James' life long dreams to ride a cow...
The other cow wasn't as friendly as the calf.  She came over to get some hay and then went back to her lonely corner.  I guess I'd be pretty bummed if there were no bulls around on my Saturday night either.  (Not to mention a Saturday night of a holiday weekend.)
After we got a nice coating of cow slobber on our hands, we went to grab some ice cream.  Joe didn't share but I let James have some of mine.  Patiently waiting for another bite...
Oh man...it's coming!
So good...
After the little monster falls asleep, we'll try to get everything assembled in the mudroom - so we'll just have painting left to do.

Oh, and I should also mention that Joe spent a few hours this morning cleaning up the yard.  It was a mess from the storm that blew through here last weekend but luckily there was no real damage.  We still have a lot of branches/trees that need to be chopped down before the next storm rolls through and one of them decides to fall on the house - so if anyone is insured, bored, and loves cutting down trees, come on by!

Well, that's all for now!  TTFN!